Spotting the Warning Signs of a Poor Roof Installation
Why improper roof installation matters more than most homeowners realize
We install and restore roofs every week, and we see the same pattern behind early leaks, wind damage and warranty denials: mistakes made on day one. A roof is a system, not just shingles. If the sequencing, fastening, flashing, ventilation or water-shedding details are wrong in even one place, water finds the path of least resistance, accelerates wear and compromises your home’s structure. The goal of this guide is to help you recognize installation errors from the curb and in the attic so problems can be corrected before they become major claims or full replacements.
Curb-view indicators that your roof was installed incorrectly
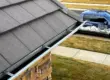
We start from the street because visual irregularities are the fastest tells. Wavy shingle courses reveal deck unevenness or poor layout. Stair-stepped keyways signal bad staggering that can expose joints to wind-driven rain. Color blotching may indicate mixed lots or heat-blistered granules caused by improper attic ventilation. Randomly missing ridge or hip caps point to under-fastening or using three-tabs as caps against manufacturer instructions. When starter strips are missing or reversed, you’ll see first-course tabs lacking adhesive bond at the eaves; this is a common cause of shingles lifting in high winds. Drip edges that sit behind, not over, the underlayment telegraph as dark lines or shadowing along the eaves and can wick water under the roof edge.
Fasteners and nailing patterns that doom a roof from day one
We check nail type, placement, count and penetration. Overdriven nails fracture the shingle mat and reduce pull-through resistance; underdriven nails hold shingles proud, inviting wind to catch edges. High nailing above the sealant strip leaves the critical lamination unbonded, while low nailing into the exposure invites direct water. Nails must penetrate the deck by the required depth; nails too short in overlays or on thicker sheathing lose holding power. Consistent, manufacturer-specified nail counts per shingle, especially on hips, ridges and perimeters, are non-negotiable for wind ratings to hold. Flashing details that separate a dry home from a chronic leak
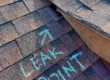
We audit every transition and penetration. Step flashing must interleave shingle by shingle up sidewalls; continuous “L” metal or caulk-only solutions are failure points. Counterflashing should be cut into masonry reglets, not face-caulked to brick. Plumbing vent boots must be sized to the pipe and sit flat, with shingles tucked over the flange. Chimney saddles (crickets) are required on wider chimneys to split water flow. Skylight flashing kits must match the curb profile and roof pitch. Improperly lapped, corroded or reused flashing allows capillary action to move water sideways into the deck and wall cavities. Global+1
Valleys, eaves and rakes: critical water-shedding geometry
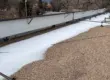
We verify valley style and execution. Open metal valleys require straight cuts, hemmed edges and correct reveal; closed-cut valleys demand precise offsets to keep cutlines out of direct flow. Ice and water membranes should be centered and extended beyond the valley lines. Along eaves, a continuous ice barrier from the drip edge to at least the interior warm-wall line protects against freeze-thaw. At rakes, drip metal must sit over underlayment with a consistent overhang so wind cannot pressure-wash rain under the shingle edge.
Underlayment and moisture barriers you’ll never see—but inspectors do
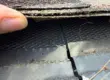
We confirm the underlayment is compatible, intact and lapped correctly. Synthetic or felt underlayment must run flat with proper horizontal and vertical overlaps and be installed beneath the drip edge at the eaves and over it at the rakes. In cold or hail-prone climates, self-adhered ice barriers belong at the eaves, in valleys and around penetrations. Missing, torn or improperly lapped underlayment often shows up months later as staining on soffits and attic sheathing after wind-driven storms.
Ridge, hip and attic ventilation that preserves your shingles and framing
We calculate net free vent area to match intake and exhaust. A ridge vent without adequate soffit intake starves the system and pulls conditioned air from the living space, which can condensate on cold sheathing. Box vents mixed with ridge vents can short-circuit airflow. Inadequate ventilation bakes shingles from beneath, causing blistering and premature granule loss, and promotes mold growth on the underside of the deck. Proper baffles at eaves maintain airflow over insulation to the ridge, keeping the roof assembly dry.
Attic-side symptoms that confirm a bad installation
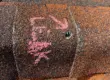
We look for daylight at ridge or sheathing seams, rusted nail tips, icy sheathing in winter, and dark fungal staining. Water tracks under nails or around vents reveal failed flashing or high nailing. Matted insulation with tide lines indicates repeat wetting. Resin bleed or delamination of OSB suggests chronic moisture. These clues help pinpoint whether the failure is workmanship, material or ventilation.
Code, manufacturer instructions and warranty alignment
We install to current building codes, then overlay manufacturer instructions, then local best practices for climate. Wind ratings, fire ratings and impact classifications depend on fastening, starter placement, underlayment and accessory selection. Deviations void limited warranties and can affect insurance claims after hail or wind events. Keeping documentation of materials used, lot numbers and installation photos protects your coverage.
Hail, UV and freeze-thaw realities at elevation
We account for intense UV, rapid temperature swings and seasonal hail typical of the central Rockies. UV accelerates asphalt aging when ventilation is poor. Freeze-thaw expands micro-cracks at joints, so correct membrane placement and sealed flashings matter more. Impact-rated shingles can help, but only if installed with the specified nails, deck thickness and accessory set.
How we diagnose: our step-by-step forensic inspection
We begin with a perimeter walk to document overhangs, drip edges and shingle layout. We photograph ridges, hips, valleys and penetrations. We test adhesion at sample tabs to verify seal lines, then examine fastener placement against nail lines with careful lifting where appropriate. We probe flashing laps and counterflashing terminations. In the attic, we trace moisture paths, measure intake and exhaust venting, confirm baffle placement and scan the deck for deflection. We finish with a written report that ties each symptom to its root cause and outlines a corrective scope that preserves manufacturer coverage.
Common fixes that restore performance without a full replacement
We selectively renail with proper placement and fastener length where high nailing is isolated. We replace improperly used ridge or hip pieces and install correct caps. We remove and relay first courses with proper starter orientation and bonding. We retrofit step and counterflashing at sidewalls and chimneys, cut and reglet into masonry, and seal with compatible materials. We re-do valleys to the chosen spec, add or extend ice and water membranes, and correct drip edge laps. We balance ventilation by adding soffit intake, continuous ridge exhaust and eave baffles, then verify airflow. These targeted repairs often extend service life and restore warranty compliance when done promptly and documented thoroughly.
Selecting a contractor who won’t repeat the same mistakes
We recommend verifying proof of insurance, local licensing, manufacturer training and references with addresses you can drive by. Demand written scopes specifying underlayment type, flashing metals, ice barrier coverage, nail counts and placement, and venting calculations. Require photo documentation during the job and post-installation checklists tied to manufacturer instructions, not just generic promises. Invite third-party inspections where appropriate to validate workmanship against code and specs.
When replacement is the smart investment
We weigh deck condition, membrane continuity, flashing integrity, shingle age and storm history. If the roof has systemic layout errors, pervasive high nailing, widespread flashing failures or chronic ventilation defects, localized repair becomes false economy. Full system replacement enables us to correct substrate issues, re-detail every transition, and install a manufacturer-aligned system with validated wind and impact ratings for your address.
Your next step
We encourage a professional diagnostic before storm season. If you are in or near Littleton, we provide thorough inspections, photo-rich reports and code-conforming remedies through GCCS Roofing, LLC, with projects managed to manufacturer specifications from starter strip to ridge.
CONCLUSION
We treat a roof as an integrated, climate-specific system where water management, mechanical fastening and airflow must work together. By scrutinizing curb-view patterns, fastener placement, flashing transitions, underlayment laps and attic-side moisture, we identify the exact workmanship faults that undermine durability. With documented corrections tied to code and manufacturer instructions, we restore performance, preserve coverage and protect the structure for the long term.