Roof Hit by Hail? Next Steps You Should Take Immediately
Quick-Start Checklist (First 24–72 Hours)
- Stay off the roof; avoid ladders, power lines, and slick surfaces
- Photograph yard, siding, gutters, windows, AC fins, decks, and vehicles
- Photograph ceilings, walls, attic, and electrical fixtures for interior evidence
- Place buckets, move furniture, lay plastic sheeting, and save all mitigation receipts
- Schedule a professional roof inspection with a written, photo-documented report
- Notify your insurer promptly to establish a claim and confirm deadlines
- Create a storm file with dates, names, claim number, and all communications
How to Recognize Real Hail Damage
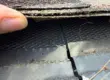
- Asphalt shingles: random impact marks, soft “bruises,” granule loss exposing black mat, cracked or creased tabs
- Metal components: visible dents on gutters, downspouts, drip edge, vents, chimney caps, skylight frames
- Soft metals and accessories: AC condenser fin dents and mailbox dings that corroborate hail size and direction
- Siding, paint, and trim: chips, cracks, spatter marks; note windward vs. leeward elevations
- Interior/attic: new ceiling stains, bubbling paint, musty odors, wet insulation, daylight through penetrations
Step-by-Step From Inspection to Closeout
- Inspection
- Request slope-by-slope assessment, test squares, and separate documentation for wind vs. hail
- Expect photos, pitch/measurement data, ventilation notes, and repair vs. replacement rationale
- Claim Filing
- Submit your photos and the inspection report
- Ask about deductible, timeline, documentation rules, and recoverable depreciation terms
- Adjuster Meeting
- Have your contractor meet the adjuster on the roof
- Align on hits per test square, accessories, flashing, ridge, starter, underlayment, and ventilation
- Scope Approval & First Payment
- Review a line-item scope; avoid vague lump sums
- Receive the ACV check (RCV minus deductible and depreciation) if applicable
- Build Phase
- Expect tear-off, deck inspection, code upgrades, and municipal inspections
- Document hidden damage (rotted decking, mis-nailed sheathing) for supplements
- Final Payment & Closeout
- Carrier releases recoverable depreciation after completion and invoice
- Receive final photos, permits, warranties, lien waiver, and paid-in-full receipt
Insurance Terms You Should Know
- Replacement Cost Value (RCV): current cost to replace with like kind and quality
- Actual Cash Value (ACV): RCV minus depreciation for age/condition
- Deductible: your contractual out-of-pocket amount; cannot be waived legally
- Recoverable depreciation: amount released after work is completed and invoiced (if your policy allows)
- Supplements: documented additions for code-required items, manufacturer-required accessories, and hidden damage
Materials and Upgrades That Pay Off in Hail Country
- Class 4 (UL 2218) impact-resistant shingles for improved resilience and potential premium credits
- High-temp synthetic underlayment, full metal drip edge, and ice/water shield in valleys and eaves
- Balanced attic ventilation (intake plus exhaust) to protect shingles and maintain warranties
- Flashing upgrades at chimneys, sidewalls, and penetrations with manufacturer-approved systems
- Consider stone-coated steel, standing seam metal, or premium synthetics where budget and design align
Contractor Vetting to Protect Your Investment
- Verify local licensing, insurance, references, and permit history
- Require a written contract with brand/series, underlayment, ventilation plan, flashing kits, and warranty terms
- Avoid door-to-door pressure; compare at least two detailed proposals
- Confirm clear payment schedule, lien waivers, and change-order process
- Ensure code and manufacturer specs are explicitly included and documented
Preventing Interior Damage and Mold
- Start dry-out within 24–48 hours using fans and dehumidifiers; keep receipts
- Replace wet insulation; monitor drywall moisture before repainting
- Have an electrician inspect fixtures if water reached any electrical components
- Recheck the attic after the next rain to confirm the leak is resolved
When Repair Isn’t Enough
- Widespread bruising, cracks, or creases indicate shortened shingle life and higher leak risk
- Multi-slope impacts create patchwork aesthetics and potential color mismatch
- Manufacturer warranties may be jeopardized by improper or heat-based shingle repairs
- Full-slope or full-roof replacement often restores uniform performance and appearance
Common Mistakes to Avoid
- Calling the insurer before a qualified inspection and ending up with a zero-pay claim on record
- Allowing unqualified foot traffic that scuffs shingles and confuses the damage picture
- Accepting vague estimates without line items for accessories, underlayment, ventilation, and flashing
- Chasing the lowest price instead of scope completeness and code compliance
- Delaying mitigation and allowing secondary damage, mold, and decking rot
- Ignoring ventilation, which bakes shingles and voids warranties
Documentation You Should Expect
- Detailed contract, product cut sheets, and color selections
- Permit records and passed inspection results
- Before–during–after photos and slope-by-slope notes
- Final invoice that matches the approved scope
- Manufacturer and workmanship warranties, properly registered
- Lien waiver on final payment
Typical Timeline Without Surprises
- Day 0–3: inspection, photos, written report
- Day 3–10: claim filing, adjuster scheduling, on-roof meeting
- Day 10–24: scope alignment, ACV payment, material ordering, permitting
- 1–3 workdays: tear-off, installation, municipal inspections (home size and complexity vary)
- 7–21 days post-build: final invoicing, recoverable depreciation release, closeout packet
Post-Storm Upkeep for Long-Term Performance
- Schedule annual roof checkups after major weather seasons
- Clean gutters and downspouts to prevent overflow and fascia damage
- Trim overhanging branches to reduce impact and abrasion
- Review policy updates annually for coverage changes and deductible options
- Keep a maintenance log with photos to support any future claims
Service Area Note
- For homeowners near the Front Range seeking end-to-end inspection, documentation, claim coordination, code-compliant installation, and warranty-backed closeout, GCCS Roofing, LLC provides roofing services from its base in Littleton, CO.
Conclusion
- Prioritize safety, evidence collection, and fast mitigation
- Get a professional, photo-documented inspection before filing the claim
- Align scope on the roof with the adjuster and insist on line-item clarity
- Choose materials and ventilation that meet Colorado codes and manufacturer specs
- Close the claim with registered warranties, lien waivers, and complete documentation
- Protect your home now and strengthen it against the next hail season