Preparing Your Roof for the Season’s First Snow: A Detailed Inspection & Protection Guide
As winter arrives, the first snowfall presents a critical moment to assess your roof’s integrity and readiness. This guide walks you through each step of a comprehensive inspection, what to look for under snow and ice stress, and how to act before damage arises.
Understanding the Stakes: Snow, Ice, and Roof Vulnerability
When snow accumulates, its weight can intensify pressure across roofing systems—especially in Colorado, where freeze-thaw cycles frequently follow initial storms. Moving water from melting and refreezing often leads to ice dams. These dams trap water behind the eaves, which may back up under shingles, saturate sheathing, and leak into your home’s interior. Inadequate insulation or ventilation exacerbates these risks by melting snow from below and contributing to ice‐formation at the edges.
Roofing components like flashing, underlayment, fasteners, and valley intersections are common failure points. Without proper maintenance, small defects—loosened shingles, compromised seals, clogged gutters—can cascade into costly leaks, structural damage, or mold issues.
Pre-Snow Roof Inspection: The Indoor Assessment (Attic to Ceilings)
Begin the inspection from the inside, because signs of roof compromise often show first beneath:
- In the attic, scan sheathing, rafters, and joists for water stains, darkened boards, or drying streaks. Compression or discoloration indicates moisture intrusion.
- Inspect insulation for wet clumps or spots. Damp insulation loses its effectiveness and encourages condensation.
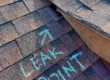
- Look for daylight penetrating the roof deck—pinholes, cracks, or splits mean potential water entry points.
- Examine common leak locations: around plumbing vents, chimney stacks, duct boots, skylights, or electrical penetrations. Look for gaps or misalignment.
- Check for signs of attic humidity or condensation, particularly on rafters or underside of sheathing. In winter, moisture can freeze and worsen structural stress.
- Evaluate the roof deck’s structure. Sagging, uneven planes, or distortion suggest load stress or underlying framing issues.
If any of these symptoms are present, immediate action is needed before snow settles.
Exterior Roof Inspection: What to Examine Before Climbing
Always prioritize safety—use proper fall protection and stable ladders. From the rooftop:
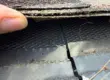
- Survey shingles for curling, cracked edges, granule loss, or bare spots. Lifted or loose shingles are vulnerable to wind or ice infiltration.
- Check flashing at chimneys, dormers, valleys, and vent pipes. Look for lifts, gaps, or cracked sealant.
- Examine ridge caps and hip shingles for separation or shifting.
- Inspect valleys and roof intersections for debris or compromised waterproof barriers.
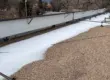
- Assess the roof perimeter for ice dam beginnings—look for ridges of ice or trapped snow along eaves.
- Look for signs of prior repair patches or mismatched materials—they may indicate weak spots.
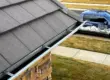
Don’t forget to inspect gutters and downspouts: clogged channels or sagging gutters prevent proper drainage and encourage ice buildup.
Critical Focus Areas: Flashing, Seals & Drainage Paths
Flashing junctions are recurring sources of leaks in winter. Ensure that:
- Metal flashing is firmly seated, without movement or gaps.
- Sealants are flexible and continuous—not cracked or missing.
- Counterflashing overlaps base flashing properly.
- Step flashing along walls and chimneys is intact and overlaps in correct layers.
- Valleys are free of debris and show no signs of rust or perforation.
Ensure gutters slope toward downspouts with no dips; downspout terminations should discharge at least 4 to 6 feet from foundation to avoid ice backing up.
Snow & Ice Management Techniques
Once snow accumulates:
- Use a roof rake or specialized snow removal tool to gently pull snow downward off the roof before it becomes heavy.
- Begin clearing when 4–6 inches accumulate, or earlier if drifting or wet snow appears.
- Never use metal shovels or sharp tools against roofing materials.
- If ice dams form, avoid chipping at them directly: instead, melt channels gently using roof-safe de-icing cables or calcium chloride ice melt (in socks) above the dam.
- Consider installing snow guards or heat cables at eaves or valleys to reduce sudden snow slides or ice buildup.
Insulation, Ventilation & Thermal Balance
Proper attic temperature balance is vital to prevent snowmelt above and freeze below:
- Confirm that insulation covers the attic floor uniformly without compressions or voids.
- Seal attic bypasses—gaps around plumbing, chimneys, junction boxes—that allow warm air into the roof cavity.
- Check that venting—ridge vents, soffit vents, gable vents—is clear, unobstructed, and balanced to maintain a consistent roof deck temperature.
- In cases of retrofitting needs, add baffles to preserve airflow over insulation.
These steps reduce heat escaping upward, stabilizing roof surface temperature and inhibiting ice dam formation.
Post-Snow Inspection: What to Assess After the Storm
Once snow begins melting:
- Look for leaks or water staining at interior ceilings or walls immediately after thaw.
- Inspect fascia, soffits, and gutters for sagging or signs of stress.
- Verify that flashing and penetrations held under ice stress.
- Track any structural shifts, sagging, or deck distortions.
- Document any damage with photos for insurance or repair planning.
Scheduling Professional Support and Repairs
Routine inspections are essential, but for situations involving structural damage, inaccessible roof areas, or evidence of leaks, enlist professional help. Roofing specialists bring safe access, thermal imaging diagnostics, and repair tools. One trusted local option is GCCS Roofing, LLC, serving Littleton, CO. They can perform winter preps, emergency remediation, or full replacements as needed.
Final Notes for Long-Term Winter Roof Health
Begin early—prior to heavy snow—is the best time to catch and resolve issues. Maintain inspection records, photograph problem areas, and plan scheduled checkups every fall. Proactive maintenance and vigilant inspection make the difference between a secure winter and costly interior damage.
Conclusion
The first snowfall is more than just a seasonal marker—it’s a natural stress test for every element of your roofing system. A roof that performs flawlessly during the initial storm sets the tone for a safe, energy-efficient, and damage-free winter. By conducting a thorough inspection before and after snow arrives, homeowners ensure their property’s longevity and structural integrity.
Early detection of weaknesses in shingles, flashing, and insulation allows for targeted repairs before harsh conditions escalate minor flaws into costly emergencies. Investing time in preventive care reduces not only financial risks but also preserves indoor comfort and energy efficiency throughout the coldest months.
Ultimately, a roof’s winter resilience depends on preparation, consistency, and professional insight. Conducting detailed inspections, maintaining proper ventilation, clearing snow responsibly, and acting swiftly at the first sign of trouble ensure that your roof remains a dependable barrier against Colorado’s demanding winter climate.